


Apache Presto is an open source distributed SQL engine. Presto originated at Facebook for data analytics needs and later was open sourced. Now, Teradata joins Presto community and offers support.
Apache Presto is very useful for performing queries even petabytes of data. Extensible architecture and storage plugin interfaces are very easy to interact with other file systems. Most of today’s best industrial companies are adopting Presto for its interactive speeds and low latency performance.
This tutorial explores Presto architecture, configuration, and storage plugins. It discusses the basic and advanced queries and finally concludes with real-time examples.
Audience
This tutorial has been prepared for professionals aspiring to make a career in Big Data Analytics. This tutorial will give you enough understanding on Apache Presto.
Prerequisites
Before proceeding with this tutorial, you must have a good understanding of Core Java, DBMS and any of the Linux operating systems.
Apache Presto - Overview
Data analytics is the process of analyzing raw data to gather relevant information for better decision making. It is primarily used in many organizations to make business decisions. Well, big data analytics involves a large amount of data and this process is quite complex, hence companies use different strategies.
For example, Facebook is one of the leading data driven and largest data warehouse company in the world. Facebook warehouse data is stored in Hadoop for large scale computation. Later, when warehouse data grew to petabytes, they decided to develop a new system with low latency. In the year of 2012, Facebook team members designed “Presto” for interactive query analytics that would operate quickly even with petabytes of data.
What is Apache Presto?
Apache Presto is a distributed parallel query execution engine, optimized for low latency and interactive query analysis. Presto runs queries easily and scales without down time even from gigabytes to petabytes.
A single Presto query can process data from multiple sources like HDFS, MySQL, Cassandra, Hive and many more data sources. Presto is built in Java and easy to integrate with other data infrastructure components. Presto is powerful, and leading companies like Airbnb, DropBox, Groupon, Netflix are adopting it.
Presto − Features
Presto contains the following features −
- Simple and extensible architecture.
- Pluggable connectors - Presto supports pluggable connector to provide metadata and data for queries.
- Pipelined executions - Avoids unnecessary I/O latency overhead.
- User-defined functions - Analysts can create custom user-defined functions to migrate easily.
- Vectorized columnar processing.
Presto − Benefits
Here is a list of benefits that Apache Presto offers −
- Specialized SQL operations
- Easy to install and debug
- Simple storage abstraction
- Quickly scales petabytes data with low latency
Presto − Applications
Presto supports most of today’s best industrial applications. Let’s take a look at some of the notable applications.
- Facebook − Facebook built Presto for data analytics needs. Presto easily scales large velocity of data.
- Teradata − Teradata provides end-to-end solutions in Big Data analytics and data warehousing. Teradata contribution to Presto makes it easier for more companies to enable all analytical needs.
- Airbnb − Presto is an integral part of the Airbnb data infrastructure. Well, hundreds of employees are running queries each day with the technology.
Why Presto?
Presto supports standard ANSI SQL which has made it very easy for data analysts and developers. Though it is built in Java, it avoids typical issues of Java code related to memory allocation and garbage collection. Presto has a connector architecture that is Hadoop friendly. It allows to easily plug in file systems.
Presto runs on multiple Hadoop distributions. In addition, Presto can reach out from a Hadoop platform to query Cassandra, relational databases, or other data stores. This cross-platform analytic capability allows Presto users to extract maximum business value from gigabytes to petabytes of data.
Apache Presto - Architecture
The architecture of Presto is almost similar to classic MPP (massively parallel processing) DBMS architecture. The following diagram illustrates the architecture of Presto.
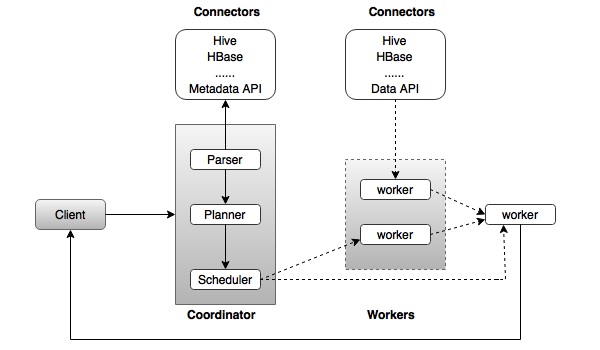
The above diagram consists of different components. Following table describes each of the component in detail.
| S.No | Component & Description |
|---|---|
| 1. |
Client
Client (Presto CLI) submits SQL statements to a coordinator to get the result.
|
| 2. |
Coordinator
Coordinator is a master daemon. The coordinator initially parses the SQL queries then analyzes and plans for the query execution. Scheduler performs pipeline execution, assigns work to the closest node and monitors progress.
|
| 3. |
Connector
Storage plugins are called as connectors. Hive, HBase, MySQL, Cassandra and many more act as a connector; otherwise you can also implement a custom one. The connector provides metadata and data for queries. The coordinator uses the connector to get metadata for building a query plan.
|
| 4. |
Worker
The coordinator assigns task to worker nodes. The workers get actual data from the connector. Finally, the worker node delivers result to the client.
|
Presto − Workflow
Presto is a distributed system that runs on a cluster of nodes. Presto’s distributed query engine is optimized for interactive analysis and supports standard ANSI SQL, including complex queries, aggregations, joins, and window functions. Presto architecture is simple and extensible. Presto client (CLI) submits SQL statements to a master daemon coordinator.
The scheduler connects through execution pipeline. The scheduler assigns work to nodes which is closest to the data and monitors progress. The coordinator assigns task to multiple worker nodes and finally the worker node delivers the result back to the client. The client pulls data from the output process. Extensibility is the key design. Pluggable connectors like Hive, HBase, MySQL, etc., provides metadata and data for queries. Presto was designed with a “simple storage abstraction” that makes it easy to provide SQL query capability against these different kind of data sources.
Execution Model
Presto supports custom query and execution engine with operators designed to support SQL semantics. In addition to improved scheduling, all processing is in memory and pipelined across the network between different stages. This avoids unnecessary I/O latency overhead.
Apache Presto - Installation
This chapter will explain how to install Presto on your machine. Let’s go through the basic requirements of Presto,
- Linux or Mac OS
- Java version 8
Now, let’s continue the following steps to install Presto on your machine.
Verifying Java installation
Hopefully, you have already installed Java version 8 on your machine right now, so you just verify it using the following command.
$ java -version
If Java is successfully installed on your machine, you could see the version of installed Java. If Java is not installed, follow the subsequent steps to install Java 8 on your machine.
Download JDK. Download the latest version of JDK by visiting the following link.
The latest version is JDK 8u 92 and the file is “jdk-8u92-linux-x64.tar.gz”. Please download the file on your machine.
After that, extract the files and move to the specific directory.
Then set Java alternatives. Finally Java will be installed on your machine.
Apache Presto Installation
Download the latest version of Presto by visiting the following link,
Now the latest version of “presto-server-0.149.tar.gz” will be downloaded on your machine.
Extract tar Files
Extract the tar file using the following command −
$ tar  -zxf  presto-server-0.149.tar.gz
$ cd presto-server-0.149
Configuration Settings
Create “data” directory
Create a data directory outside the installation directory, which will be used for storing logs, metadata, etc., so that it is to be easily preserved when upgrading Presto. It is defined using the following code −
$ cd
$ mkdir data
To view the path where it is located, use the command “pwd”. This location will be assigned in the next node.properties file.
Create “etc” directory
Create an etc directory inside Presto installation directory using the following code −
$ cd presto-server-0.149
$ mkdir etc
This directory will hold configuration files. Let’s create each file one by one.
Node Properties
Presto node properties file contains environmental configuration specific to each node. It is created inside etc directory (etc/node.properties) using the following code −
$ cd etc
$ vi node.properties

node.environment = production
node.id = ffffffff-ffff-ffff-ffff-ffffffffffff
node.data-dir = /Users/../workspace/Presto
After making all the changes, save the file, and quit the terminal. Here node.data is the location path of the above created data directory. node.id represents the unique identifier for each node.
JVM Config
Create a file “jvm.config” inside etc directory (etc/jvm.config). This file contains a list of command line options used for launching the Java Virtual Machine.
$ cd etc
$ vi jvm.config

-server
-Xmx16G
-XX:+UseG1GC
-XX:G1HeapRegionSize = 32M
-XX:+UseGCOverheadLimit
-XX:+ExplicitGCInvokesConcurrent
-XX:+HeapDumpOnOutOfMemoryError
-XX:OnOutOfMemoryError = kill -9 %p
After making all the changes, save the file, and quit the terminal.
Config Properties
Create a file “config.properties” inside etc directory(etc/config.properties). This file contains the configuration of Presto server. If you are setting up a single machine for testing, Presto server can function only as the coordination process as defined using the following code −
$ cd etc
$ vi config.properties

coordinator = true
node-scheduler.include-coordinator = true
http-server.http.port = 8080
query.max-memory = 5GB
query.max-memory-per-node = 1GB
discovery-server.enabled = true
discovery.uri = http://localhost:8080
Here,
- coordinator − master node.
- node-scheduler.include-coordinator − Allows scheduling work on the coordinator.
- http-server.http.port − Specifies the port for the HTTP server.
- query.max-memory=5GB − The maximum amount of distributed memory.
- query.max-memory-per-node=1GB − The maximum amount of memory per node.
- discovery-server.enabled − Presto uses the Discovery service to find all the nodes in the cluster.
- discovery.uri − he URI to the Discovery server.
If you are setting up multiple machine Presto server, Presto will function as both coordination and worker process. Use this configuration setting to test Presto server on multiple machines.
Configuration for Coordinator
$ cd etc
$ vi config.properties

coordinator = true
node-scheduler.include-coordinator = false
http-server.http.port = 8080
query.max-memory = 50GB
query.max-memory-per-node = 1GB
discovery-server.enabled = true
discovery.uri = http://localhost:8080
Configuration for Worker
$ cd etc
$ vi config.properties

coordinator = false
http-server.http.port = 8080
query.max-memory = 50GB
query.max-memory-per-node = 1GB
discovery.uri = http://localhost:8080
Log Properties
Create a file “log.properties” inside etc directory(etc/log.properties). This file contains minimum log level for named logger hierarchies. It is defined using the following code −
$ cd etc
$ vi log.properties
com.facebook.presto = INFO
Save the file and quit the terminal. Here, four log levels are used such as DEBUG, INFO, WARN and ERROR. Default log level is INFO.
Catalog Properties
Create a directory “catalog” inside etc directory(etc/catalog). This will be used for mounting data. For example, create etc/catalog/jmx.properties with the following contents to mount the jmx connector as the jmx catalog −
$ cd etc
$ mkdir catalog
$ cd catalog
$ vi jmx.properties
connector.name = jmx
Start Presto
Presto can be started using the following command,
$ bin/launcher start
Then you will see the response similar to this,
Started as 840
Run Presto
To launch Presto server, use the following command −
$ bin/launcher run
After successfully launching Presto server, you can find log files in “var/log” directory.
- launcher.log − This log is created by the launcher and is connected to the stdout and stderr streams of the server.
- server.log − This is the main log file used by Presto.
- http-request.log − HTTP request received by the server.
As of now, you have successfully installed Presto configuration settings on your machine. Let’s continue the steps to install Presto CLI.
Install Presto CLI
The Presto CLI provides a terminal-based interactive shell for running queries.
Download the Presto CLI by visiting the following link,
Now “presto-cli-0.149-executable.jar” will be installed on your machine.
Run CLI
After downloading the presto-cli, copy it to the location which you want to run it from. This location may be any node that has network access to the coordinator. First change the name of the Jar file to Presto. Then make it executable with chmod + x command using the following code −
$ mv presto-cli-0.149-executable.jar presto
$ chmod +x presto
Now execute CLI using the following command,
./presto --server localhost:8080 --catalog jmx --schema default
Here jmx(Java Management Extension) refers to catalog and default referes to schema.
You will see the following response,
presto:default>
Now type “jps” command on your terminal and you will see the running daemons.
Stop Presto
After having performed all the executions, you can stop the presto server using the following command −
$ bin/launcher stop
Apache Presto - Configuration Settings
This chapter will discuss the configuration settings for Presto.
Presto Verifier
The Presto Verifier can be used to test Presto against another database (such as MySQL), or to test two Presto clusters against each other.
Create Database in MySQL
Open MySQL server and create a database using the following command.
create database test
Now you have created “test” database in the server. Create the table and load it with the following query.
CREATE TABLE verifier_queries(
   id INT NOT NULL AUTO_INCREMENT,
   suite VARCHAR(256) NOT NULL,
   name VARCHAR(256),
   test_catalog VARCHAR(256) NOT NULL,
   test_schema VARCHAR(256) NOT NULL,
   test_prequeries TEXT,
   test_query TEXT NOT NULL,
   test_postqueries TEXT,
   test_username VARCHAR(256) NOT NULL default 'verifier-test',
   test_password VARCHAR(256),
   control_catalog VARCHAR(256) NOT NULL,
   control_schema VARCHAR(256) NOT NULL,
   control_prequeries TEXT,
   control_query TEXT NOT NULL,
   control_postqueries TEXT,
   control_username VARCHAR(256) NOT NULL default 'verifier-test',
   control_password VARCHAR(256),
   session_properties_json TEXT,
   PRIMARY KEY (id)
);
Add Config Settings
Create a properties file to configure the verifier −
$ vi config.properties

suite = mysuite
query-database = jdbc:mysql://localhost:3306/tutorials?user=root&password=pwd
control.gateway = jdbc:presto://localhost:8080
test.gateway = jdbc:presto://localhost:8080
thread-count = 1
Here, in the query-database field, enter the following details − mysql database name, user name, and password.
Download JAR File
Download Presto-verifier jar file by visiting the following link,
Now the version “presto-verifier-0.149-executable.jar” is downloaded on your machine.
Execute JAR
Execute the JAR file using the following command,
$ mv presto-verifier-0.149-executable.jar verifier
$ chmod+x verifier
Run Verifier
Run the verifier using the following command,
$ ./verifier config.properties
Create Table
Let’s create a simple table in “test” database using the following query.
create table product(id int not null, name varchar(50))
Insert Table
After creating a table, insert two records using the following query,
insert into product values(1,’Phone')
insert into product values(2,’Television’)
Run Verifier Query
Execute the following sample query in the verifier terminal (./verifier config.propeties) to check the verifier result.
Sample Query
insert into verifier_queries (suite, test_catalog, test_schema, test_query,
control_catalog, control_schema, control_query) values
('mysuite', 'mysql', 'default', 'select * from mysql.test.product',
'mysql', 'default', 'select * from mysql.test.product');
Here, select * from mysql.test.product query refers to mysql catalog, test is database name and product is table name. In this way, you can access mysql connector using Presto server.
Here, two same select queries are tested against each other to see the performance. Similarly, you can run other queries to test the performance results. You can also connect two Presto clusters to check the performance results.
Apache Presto - Administration Tools
Java Management Extensions (JMX) gives information about the Java Virtual Machine and software running inside JVM. The JMX connector is used to query JMX information in Presto server.
As we have already enabled “jmx.properties” file under “etc/catalog” directory. Now connect Prest CLI to enable JMX plugin.
Presto CLI
Query
$ ./presto --server localhost:8080 --catalog jmx --schema jmx
Result
You will receive the following response.
presto:jmx>
JMX Schema
To list out all the schemas in “jmx”, type the following query.
Query
presto:jmx> show schemas from jmx;
Result
      Schema
--------------------
 information_schema
 current
Show Tables
To view the tables in the “current” schema, use the following command.
Query 1
presto:jmx> show tables from jmx.current;
Result
                                    Table
------------------------------------------------------------------------------
 com.facebook.presto.execution.scheduler:name = nodescheduler
 com.facebook.presto.execution:name = queryexecution
 com.facebook.presto.execution:name = querymanager
 com.facebook.presto.execution:name = remotetaskfactory
 com.facebook.presto.execution:name = taskexecutor
 com.facebook.presto.execution:name = taskmanager
 com.facebook.presto.execution:type = queryqueue,name = global,expansion = global
 ………………
 ……………….
Query 2
presto:jmx> select * from jmx.current.”java.lang:type = compilation";
Result
node               | compilationtimemonitoringsupported |      name   |         objectname         | totalcompilationti
--------------------------------------+------------------------------------+--------------------------------+----------------------------+-------------------
ffffffff-ffff-ffff-ffff-ffffffffffff | true | HotSpot 64-Bit Tiered Compilers | java.lang:type=Compilation |       1276
Query 3
presto:jmx> select * from jmx.current."com.facebook.presto.server:name = taskresource";
Result
 node                 | readfromoutputbuffertime.alltime.count
 | readfromoutputbuffertime.alltime.max | readfromoutputbuffertime.alltime.maxer
 --------------------------------------+---------------------------------------+--------------------------------------+---------------------------------------
 ffffffff-ffff-ffff-ffff-ffffffffffff |                                   92.0 |                          1.009106149 |
Apache Presto - HIVE Connector
The Hive connector allows querying data stored in a Hive data warehouse.
Prerequisites
- Hadoop
- Hive
Hopefully you have installed Hadoop and Hive on your machine. Start all the services one by one in the new terminal. Then, start hive metastore using the following command,
hive --service metastore
Presto uses Hive metastore service to get the hive table’s details.
Configuration Settings
Create a file “hive.properties” under “etc/catalog” directory. Use the following command.
$ cd etc
$ cd catalog
$ vi hive.properties

connector.name = hive-cdh4
hive.metastore.uri = thrift://localhost:9083
After making all the changes, save the file and quit the terminal.
Create Database
Create a database in Hive using the following query −
Query
hive> CREATE SCHEMA tutorials;
After the database is created, you can verify it using the “show databases” command.
Create Table
Create Table is a statement used to create a table in Hive. For example, use the following query.
hive> create table author(auth_id int, auth_name varchar(50),
topic varchar(100) STORED AS SEQUENCEFILE;
Insert Table
Following query is used to insert records in hive’s table.
hive> insert into table author values (1,’ Doug Cutting’,Hadoop),
(2,’ James Gosling’,java),(3,’ Dennis Ritchie’,C);
Start Presto CLI
You can start Presto CLI to connect Hive storage plugin using the following command.
$ ./presto --server localhost:8080 --catalog hive —schema tutorials;
You will receive the following response.
presto:tutorials >
List Schemas
To list out all the schemas in Hive connector, type the following command.
Query
presto:tutorials > show schemas from hive;
Result
default

tutorials
List Tables
To list out all the tables in “tutorials” schema, use the following query.
Query
presto:tutorials > show tables from hive.tutorials;
Result
author
Fetch Table
Following query is used to fetch all the records from hive’s table.
Query
presto:tutorials > select * from hive.tutorials.author;
Result
auth_id  |   auth_name    | topic
---------+----------------+--------
       1 | Doug Cutting   | Hadoop
       2 | James Gosling  | java
       3 | Dennis Ritchie | C
Apache Presto - KAFKA Connector
The Kafka Connector for Presto allows to access data from Apache Kafka using Presto.
Prerequisites
Download and install the latest version of the following Apache projects.
- Apache ZooKeeper
- Apache Kafka
Start ZooKeeper
Start ZooKeeper server using the following command.
$ bin/zookeeper-server-start.sh config/zookeeper.properties
Now, ZooKeeper starts port on 2181.
Start Kafka
Start Kafka in another terminal using the following command.
$ bin/kafka-server-start.sh config/server.properties
After kafka starts, it uses the port number 9092.
TPCH Data
Download tpch-kafka
$  curl -o kafka-tpch
https://repo1.maven.org/maven2/de/softwareforge/kafka_tpch_0811/1.0/kafka_tpch_
0811-1.0.sh
Now you have downloaded the loader from Maven central using the above command. You will get a similar response as the following.
% Total    % Received % Xferd  Average Speed   Time    Time     Time  Current
                                 Dload  Upload   Total   Spent    Left  Speed
  0     0    0     0    0     0      0      0 --:--:--  0:00:01 --:--:--     0
  5 21.6M    5 1279k    0     0  83898      0  0:04:30  0:00:15  0:04:15  129k
  6 21.6M    6 1407k    0     0  86656      0  0:04:21  0:00:16  0:04:05  131k
 24 21.6M   24 5439k    0     0   124k      0  0:02:57  0:00:43  0:02:14  175k
 24 21.6M   24 5439k    0     0   124k      0  0:02:58  0:00:43  0:02:15  160k
 25 21.6M   25 5736k    0     0   128k      0  0:02:52  0:00:44  0:02:08  181k
 ………………………..
Then, make it executable using the following command,
$ chmod 755 kafka-tpch
Run tpch-kafka
Run the kafka-tpch program to preload a number of topics with tpch data using the following command.
Query
$ ./kafka-tpch load --brokers localhost:9092 --prefix tpch. --tpch-type tiny
Result
2016-07-13T16:15:52.083+0530 INFO main io.airlift.log.Logging Logging
to stderr
2016-07-13T16:15:52.124+0530 INFO main de.softwareforge.kafka.LoadCommand
Processing tables: [customer, orders, lineitem, part, partsupp, supplier,
nation, region]
2016-07-13T16:15:52.834+0530 INFO pool-1-thread-1
de.softwareforge.kafka.LoadCommand Loading table 'customer' into topic 'tpch.customer'...
2016-07-13T16:15:52.834+0530 INFO pool-1-thread-2
de.softwareforge.kafka.LoadCommand Loading table 'orders' into topic 'tpch.orders'...
2016-07-13T16:15:52.834+0530 INFO pool-1-thread-3
de.softwareforge.kafka.LoadCommand Loading table 'lineitem' into topic 'tpch.lineitem'...
2016-07-13T16:15:52.834+0530 INFO pool-1-thread-4
de.softwareforge.kafka.LoadCommand Loading table 'part' into topic 'tpch.part'...
………………………
……………………….
Now, Kafka tables customers,orders,supplier, etc., are loaded using tpch.
Add Config Settings
Let’s add the following Kafka connector configuration settings on Presto server.
connector.name = kafka

kafka.nodes = localhost:9092

kafka.table-names = tpch.customer,tpch.orders,tpch.lineitem,tpch.part,tpch.partsupp,
tpch.supplier,tpch.nation,tpch.region

kafka.hide-internal-columns = false
In the above configuration, Kafka tables are loaded using Kafka-tpch program.
Start Presto CLI
Start Presto CLI using the following command,
$ ./presto --server localhost:8080 --catalog kafka —schema tpch;
Here “tpch" is a schema for Kafka connector and you will receive a response as the following.
presto:tpch>
List Tables
Following query lists out all the tables in “tpch” schema.
Query
presto:tpch> show tables;
Result
  Table
----------
 customer
 lineitem
 nation
 orders
 part
 partsupp
 region
 supplier
Describe Customer Table
Following query describes “customer” table.
Query
presto:tpch> describe customer;
Result
Column           |  Type   |                   Comment
-------------------+---------+---------------------------------------------
 _partition_id     | bigint  | Partition Id
 _partition_offset | bigint  | Offset for the message within the partition
 _segment_start    | bigint  | Segment start offset
 _segment_end      | bigint  | Segment end offset
 _segment_count    | bigint  | Running message count per segment
 _key              | varchar | Key text
 _key_corrupt      | boolean | Key data is corrupt
 _key_length       | bigint  | Total number of key bytes
 _message          | varchar | Message text
 _message_corrupt  | boolean | Message data is corrupt
 _message_length   | bigint  | Total number of message bytes
Apache Presto - JDBC Interface
Presto’s JDBC interface is used to access Java application.
Prerequisites
Install presto-jdbc-0.150.jar
You can download the JDBC jar file by visiting the following link,
After the jar file has been downloaded, add it to the class path of your Java application.
Create a Simple Application
Let’s create a simple java application using JDBC interface.
Coding − PrestoJdbcSample.java
import java.sql.*;
import com.facebook.presto.jdbc.PrestoDriver;

//import presto jdbc driver packages here.
public class PrestoJdbcSample {
   public static void main(String[] args) {
      Connection connection = null;
      Statement statement = null;
      try {

         Class.forName("com.facebook.presto.jdbc.PrestoDriver");
         connection = DriverManager.getConnection(
         "jdbc:presto://localhost:8080/mysql/tutorials", "tutorials", “");

         //connect mysql server tutorials database here
         statement = connection.createStatement();
         String sql;
         sql = "select auth_id, auth_name from mysql.tutorials.author”;

         //select mysql table author table two columns
         ResultSet resultSet = statement.executeQuery(sql);
         while(resultSet.next()){
            int id  = resultSet.getInt("auth_id");
            String name = resultSet.getString(“auth_name");
            System.out.print("ID: " + id + ";\nName: " + name + "\n");
         }

         resultSet.close();
         statement.close();
         connection.close();

      }catch(SQLException sqlException){
         sqlException.printStackTrace();
      }catch(Exception exception){
         exception.printStackTrace();
      }
   }
}
Save the file and quit the application. Now, start Presto server in one terminal and open a new terminal to compile and execute the result. Following are the steps −
Compilation
~/Workspace/presto/presto-jdbc $ javac -cp presto-jdbc-0.149.jar PrestoJdbcSample.java
Execution
~/Workspace/presto/presto-jdbc $ java -cp .:presto-jdbc-0.149.jar PrestoJdbcSample
Output
INFO: Logging initialized @146ms
ID: 1;
Name: Doug Cutting
ID: 2;
Name: James Gosling
ID: 3;
Name: Dennis Ritchie
Apache Presto - Custom Function Application
Create a Maven project to develop Presto custom function.
SimpleFunctionsFactory.java
Create SimpleFunctionsFactory class to implement FunctionFactory interface.
package com.tutorialspoint.simple.functions;

import com.facebook.presto.metadata.FunctionFactory;
import com.facebook.presto.metadata.FunctionListBuilder;
import com.facebook.presto.metadata.SqlFunction;
import com.facebook.presto.spi.type.TypeManager;
import java.util.List;

public class SimpleFunctionFactory implements FunctionFactory {

   private final TypeManager typeManager;
   public SimpleFunctionFactory(TypeManager typeManager) {
      this.typeManager = typeManager;
   }
    @Override

   public List<SqlFunction> listFunctions() {
      return new FunctionListBuilder(typeManager)
      .scalar(SimpleFunctions.class)
      .getFunctions();
   }
}
SimpleFunctionsPlugin.java
Create a SimpleFunctionsPlugin class to implement Plugin interface.
package com.tutorialspoint.simple.functions;

import com.facebook.presto.metadata.FunctionFactory;
import com.facebook.presto.spi.Plugin;
import com.facebook.presto.spi.type.TypeManager;
import com.google.common.collect.ImmutableList;
import javax.inject.Inject;
import java.util.List;
import static java.util.Objects.requireNonNull;

public class SimpleFunctionsPlugin implements Plugin {
   private TypeManager typeManager;
   @Inject

   public void setTypeManager(TypeManager typeManager) {
      this.typeManager = requireNonNull(typeManager, "typeManager is null”);
      //Inject TypeManager class here
   }
   @Override

   public <T> List<T> getServices(Class<T> type){
      if (type == FunctionFactory.class) {
         return ImmutableList.of(type.cast(new SimpleFunctionFactory(typeManager)));
      }
      return ImmutableList.of();
   }
}
Add Resource File
Create a resource file which is specified in the implementation package.
(com.tutorialspoint.simple.functions.SimpleFunctionsPlugin)
Now move to the resource file location @ /path/to/resource/
Then add the changes,
com.facebook.presto.spi.Plugin
pom.xml
Add the following dependencies to pom.xml file.
<?xml version = "1.0"?>
<project xmlns = "http://maven.apache.org/POM/4.0.0"
 xmlns:xsi="http://www.w3.org/2001/XMLSchema-instance"
 xsi:schemaLocation = "http://maven.apache.org/POM/4.0.0
    http://maven.apache.org/xsd/maven-4.0.0.xsd">

   <modelVersion>4.0.0</modelVersion>
   <groupId>com.tutorialspoint.simple.functions</groupId>
   <artifactId>presto-simple-functions</artifactId>
   <packaging>jar</packaging>
   <version>1.0</version>
   <name>presto-simple-functions</name>
   <description>Simple test functions for Presto</description>
   <properties>
      <project.build.sourceEncoding>UTF-8</project.build.sourceEncoding>
   </properties>
   <dependencies>
      <dependency>
         <groupId>com.facebook.presto</groupId>
         <artifactId>presto-spi</artifactId>
         <version>0.149</version>
      </dependency>
      <dependency>
         <groupId>com.facebook.presto</groupId>
         <artifactId>presto-main</artifactId>
         <version>0.149</version>
      </dependency>
      <dependency>
         <groupId>javax.inject</groupId>
         <artifactId>javax.inject</artifactId>
         <version>1</version>
      </dependency>
      <dependency>
         <groupId>com.google.guava</groupId>
         <artifactId>guava</artifactId>
         <version>19.0</version>
      </dependency>
   </dependencies>
   <build>
      <finalName>presto-simple-functions</finalName>
      <plugins>
      <!-- Make this jar executable -->
         <plugin>
            <groupId>org.apache.maven.plugins</groupId>
            <artifactId>maven-jar-plugin</artifactId>
            <version>2.3.2</version>
         </plugin>
      </plugins>
   </build>
</project>
SimpleFunctions.java
Create SimpleFunctions class using Presto attributes.
package com.tutorialspoint.simple.functions;

import com.facebook.presto.operator.Description;
import com.facebook.presto.operator.scalar.ScalarFunction;
import com.facebook.presto.operator.scalar.StringFunctions;
import com.facebook.presto.spi.type.StandardTypes;
import com.facebook.presto.type.LiteralParameters;
import com.facebook.presto.type.SqlType;

public final class SimpleFunctions {
   private SimpleFunctions() {
   }

   @Description("Returns summation of two numbers")
   @ScalarFunction(“mysum")
   //function name
   @SqlType(StandardTypes.BIGINT)

   public static long sum(@SqlType(StandardTypes.BIGINT) long num1,
   @SqlType(StandardTypes.BIGINT) long num2) {
      return num1 + num2;
   }
}
After the application is created compile and execute the application. It will produce the JAR file. Copy the file and move the JAR file into the target Presto server plugin directory.
Compilation
mvn compile
Execution
mvn package
Now restart Presto server and connect Presto client. Then execute the custom function application as explained below,
$ ./presto --catalog mysql --schema default
Query
presto:default> select mysum(10,10);
Result
_col0
-------
  20


