


here are many more items which you use to build a good Android application. Apart from coding for the application, you take care of various other resources like static content that your code uses, such as bitmaps, colors, layout definitions, user interface strings, animation instructions, and more. These resources are always maintained separately in various sub-directories under res/ directory of the project.
This tutorial will explain you how you can organize your application resources, specify alternative resources and access them in your applications.
Organize resource in Android Studio
MyProject/
   app/
      manifest/
         AndroidManifest.xml
   java/
      MyActivity.java
      res/
         drawable/
            icon.png
         layout/
            activity_main.xml
            info.xml
         values/
            strings.xml
| Sr.No. | Directory & Resource Type |
|---|---|
| 1 |
anim/
XML files that define property animations. They are saved in res/anim/ folder and accessed from the R.anim class.
|
| 2 |
color/
XML files that define a state list of colors. They are saved in res/color/ and accessed from the R.color class.
|
| 3 |
drawable/
Image files like .png, .jpg, .gif or XML files that are compiled into bitmaps, state lists, shapes, animation drawable. They are saved in res/drawable/ and accessed from the R.drawable class.
|
| 4 |
layout/
XML files that define a user interface layout. They are saved in res/layout/ and accessed from the R.layout class.
|
| 5 |
menu/
XML files that define application menus, such as an Options Menu, Context Menu, or Sub Menu. They are saved in res/menu/ and accessed from the R.menu class.
|
| 6 |
raw/
Arbitrary files to save in their raw form. You need to call Resources.openRawResource() with the resource ID, which is R.raw.filename to open such raw files.
|
| 7 |
values/
XML files that contain simple values, such as strings, integers, and colors. For example, here are some filename conventions for resources you can create in this directory −
|
| 8 |
xml/
Arbitrary XML files that can be read at runtime by calling Resources.getXML(). You can save various configuration files here which will be used at run time.
|
Alternative Resources
Your application should provide alternative resources to support specific device configurations. For example, you should include alternative drawable resources ( i.e.images ) for different screen resolution and alternative string resources for different languages. At runtime, Android detects the current device configuration and loads the appropriate resources for your application.
To specify configuration-specific alternatives for a set of resources, follow the following steps −
- Create a new directory in res/ named in the form <resources_name>-<config_qualifier>. Here resources_name will be any of the resources mentioned in the above table, like layout, drawable etc. The qualifier will specify an individual configuration for which these resources are to be used. You can check official documentation for a complete list of qualifiers for different type of resources.
- Save the respective alternative resources in this new directory. The resource files must be named exactly the same as the default resource files as shown in the below example, but these files will have content specific to the alternative. For example though image file name will be same but for high resolution screen, its resolution will be high.
Below is an example which specifies images for a default screen and alternative images for high resolution screen.
MyProject/
   app/
      manifest/
         AndroidManifest.xml
   java/
      MyActivity.java
         res/
            drawable/
               icon.png
               background.png
         drawable-hdpi/
            icon.png
            background.png
         layout/
            activity_main.xml
            info.xml
         values/
            strings.xml
Below is another example which specifies layout for a default language and alternative layout for Arabic language.
MyProject/
   app/
      manifest/
         AndroidManifest.xml
   java/
      MyActivity.java
      res/
         drawable/
            icon.png
            background.png
         drawable-hdpi/
            icon.png
            background.png
         layout/
            activity_main.xml
            info.xml
         layout-ar/
            main.xml
         values/
            strings.xml
Accessing Resources
During your application development you will need to access defined resources either in your code, or in your layout XML files. Following section explains how to access your resources in both the scenarios −
Accessing Resources in Code
When your Android application is compiled, a R class gets generated, which contains resource IDs for all the resources available in your res/ directory. You can use R class to access that resource using sub-directory and resource name or directly resource ID.
Example
To access res/drawable/myimage.png and set an ImageView you will use following code −
ImageView imageView = (ImageView) findViewById(R.id.myimageview);
imageView.setImageResource(R.drawable.myimage);
Here first line of the code make use of R.id.myimageview to get ImageView defined with id myimageview in a Layout file. Second line of code makes use ofR.drawable.myimage to get an image with name myimage available in drawable sub-directory under /res.
Example
Consider next example where res/values/strings.xml has following definition −
<?xml version="1.0" encoding="utf-8"?>
<resources>
   <string  name="hello">Hello, World!</string>
</resources>
Now you can set the text on a TextView object with ID msg using a resource ID as follows −
TextView msgTextView = (TextView) findViewById(R.id.msg);
msgTextView.setText(R.string.hello);
Example
Consider a layout res/layout/activity_main.xml with the following definition −
<?xml version="1.0" encoding="utf-8"?>
<LinearLayout xmlns:android="http://schemas.android.com/apk/res/android"
   android:layout_width="fill_parent"
   android:layout_height="fill_parent"
   android:orientation="vertical" >

   <TextView android:id="@+id/text"
      android:layout_width="wrap_content"
      android:layout_height="wrap_content"
      android:text="Hello, I am a TextView" />

   <Button android:id="@+id/button"
      android:layout_width="wrap_content"
      android:layout_height="wrap_content"
      android:text="Hello, I am a Button" />

</LinearLayout>
This application code will load this layout for an Activity, in the onCreate() method as follows −
public void onCreate(Bundle savedInstanceState) {
   super.onCreate(savedInstanceState);
   setContentView(R.layout.main_activity);
}
Accessing Resources in XML
Consider the following resource XML res/values/strings.xml file that includes a color resource and a string resource −
<?xml version="1.0" encoding="utf-8"?>
<resources>
   <color name="opaque_red">#f00</color>
   <string name="hello">Hello!</string>
</resources>
Now you can use these resources in the following layout file to set the text color and text string as follows −
<?xml version="1.0" encoding="utf-8"?>
<EditText xmlns:android="http://schemas.android.com/apk/res/android"
   android:layout_width="fill_parent"
   android:layout_height="fill_parent"
   android:textColor="@color/opaque_red"
   android:text="@string/hello" />
Now if you will go through previous chapter once again where I have explained Hello World! example, and I'm sure you will have better understanding on all the concepts explained in this chapter. So I highly recommend to check previous chapter for working example and check how I have used various resources at very basic level.
Android - Activities
An activity represents a single screen with a user interface just like window or frame of Java.Android activity is the subclass of ContextThemeWrapper class.
If you have worked with C, C++ or Java programming language then you must have seen that your program starts from main() function. Very similar way, Android system initiates its program with in an Activity starting with a call on onCreate() callback method. There is a sequence of callback methods that start up an activity and a sequence of callback methods that tear down an activity as shown in the below Activity life cycle diagram: (image courtesy : android.com )
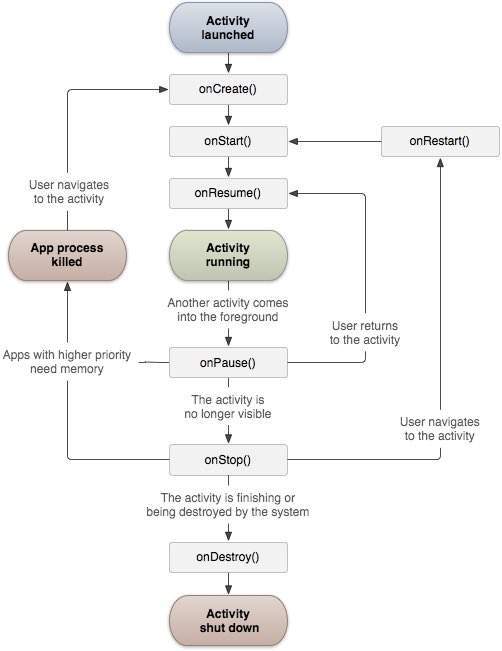
The Activity class defines the following call backs i.e. events. You don't need to implement all the callbacks methods. However, it's important that you understand each one and implement those that ensure your app behaves the way users expect.
| Sr.No | Callback & Description |
|---|---|
| 1 |
onCreate()
This is the first callback and called when the activity is first created.
|
| 2 |
onStart()
This callback is called when the activity becomes visible to the user.
|
| 3 |
onResume()
This is called when the user starts interacting with the application.
|
| 4 |
onPause()
The paused activity does not receive user input and cannot execute any code and called when the current activity is being paused and the previous activity is being resumed.
|
| 5 |
onStop()
This callback is called when the activity is no longer visible.
|
| 6 |
onDestroy()
This callback is called before the activity is destroyed by the system.
|
| 7 |
onRestart()
This callback is called when the activity restarts after stopping it.
|
Example
This example will take you through simple steps to show Android application activity life cycle. Follow the following steps to modify the Android application we created in Hello World Example chapter −
| Step | Description |
|---|---|
| 1 | You will use Android studio to create an Android application and name it as HelloWorld under a package com.example.helloworld as explained in the Hello World Example chapter. |
| 2 | Modify main activity file MainActivity.java as explained below. Keep rest of the files unchanged. |
| 3 | Run the application to launch Android emulator and verify the result of the changes done in the application. |
Following is the content of the modified main activity file src/com.example.helloworld/MainActivity.java. This file includes each of the fundamental life cycle methods. The Log.d() method has been used to generate log messages −
package com.example.helloworld;

import android.os.Bundle;
import android.app.Activity;
import android.util.Log;

public class MainActivity extends Activity {
   String msg = "Android : ";

   /** Called when the activity is first created. */
   @Override
   public void onCreate(Bundle savedInstanceState) {
      super.onCreate(savedInstanceState);
      setContentView(R.layout.activity_main);
      Log.d(msg, "The onCreate() event");
   }

   /** Called when the activity is about to become visible. */
   @Override
   protected void onStart() {
      super.onStart();
      Log.d(msg, "The onStart() event");
   }

   /** Called when the activity has become visible. */
   @Override
   protected void onResume() {
      super.onResume();
      Log.d(msg, "The onResume() event");
   }

   /** Called when another activity is taking focus. */
   @Override
   protected void onPause() {
      super.onPause();
      Log.d(msg, "The onPause() event");
   }

   /** Called when the activity is no longer visible. */
   @Override
   protected void onStop() {
      super.onStop();
      Log.d(msg, "The onStop() event");
   }

   /** Called just before the activity is destroyed. */
   @Override
   public void onDestroy() {
      super.onDestroy();
      Log.d(msg, "The onDestroy() event");
   }
}
An activity class loads all the UI component using the XML file available in res/layout folder of the project. Following statement loads UI components from res/layout/activity_main.xml file:
setContentView(R.layout.activity_main);
An application can have one or more activities without any restrictions. Every activity you define for your application must be declared in your AndroidManifest.xml file and the main activity for your app must be declared in the manifest with an <intent-filter> that includes the MAIN action and LAUNCHER category as follows:
<?xml version="1.0" encoding="utf-8"?>
<manifest xmlns:android="http://schemas.android.com/apk/res/android"
    package="com.example.tutorialspoint7.myapplication">

    <application
        android:allowBackup="true"
        android:icon="@mipmap/ic_launcher"
        android:label="@string/app_name"
        android:supportsRtl="true"
        android:theme="@style/AppTheme">
        <activity android:name=".MainActivity">
            <intent-filter>
                <action android:name="android.intent.action.MAIN" />

                <category android:name="android.intent.category.LAUNCHER" />
            </intent-filter>
        </activity>
    </application>

</manifest>
If either the MAIN action or LAUNCHER category are not declared for one of your activities, then your app icon will not appear in the Home screen's list of apps.
Let's try to run our modified Hello World! application we just modified. I assume you had created your AVD while doing environment setup. To run the app from Android studio, open one of your project's activity files and click Run  icon from the toolbar. Android studio installs the app on your AVD and starts it and if everything is fine with your setup and application, it will display Emulator window and you should see following log messages in LogCat window in Android studio −
icon from the toolbar. Android studio installs the app on your AVD and starts it and if everything is fine with your setup and application, it will display Emulator window and you should see following log messages in LogCat window in Android studio −08-23 10:32:07.682 4480-4480/com.example.helloworld D/Android :: The onCreate() event 08-23 10:32:07.683 4480-4480/com.example.helloworld D/Android :: The onStart() event 08-23 10:32:07.685 4480-4480/com.example.helloworld D/Android :: The onResume() event

Let us try to click lock screen button on the Android emulator and it will generate following events messages in LogCat window in android studio:
08-23 10:32:53.230 4480-4480/com.example.helloworld D/Android :: The onPause() event
08-23 10:32:53.294 4480-4480/com.example.helloworld D/Android :: The onStop() event
Let us again try to unlock your screen on the Android emulator and it will generate following events messages in LogCat window in Android studio:
08-23 10:34:41.390 4480-4480/com.example.helloworld D/Android :: The onStart() event
08-23 10:34:41.392 4480-4480/com.example.helloworld D/Android :: The onResume() event
Next, let us again try to click Back button  on the Android emulator and it will generate following events messages in LogCat window in Android studio and this completes the Activity Life Cycle for an Android Application.
on the Android emulator and it will generate following events messages in LogCat window in Android studio and this completes the Activity Life Cycle for an Android Application.08-23 10:37:24.806 4480-4480/com.example.helloworld D/Android :: The onPause() event 08-23 10:37:25.668 4480-4480/com.example.helloworld D/Android :: The onStop() event 08-23 10:37:25.669 4480-4480/com.example.helloworld D/Android :: The onDestroy() event


